网站地图(Sitemap)又称站点地图,它是一个网站所有链接的容器。一方面网站地图可以提高链接页面的权重,方便搜索引擎对网站页面的抓取,提高网站的收录速度,利于网站的SEO优化;另一方面网站地图可以增强访客对整个网站直观的感受,加快访客对网站信息的检索,进一步提高网站的用户体验度。之前网站使用的是柳城开发的插件Baidu Sitemap Generator生成的网站地图,这款插件总体上来说很是不错,可以生成XML及HTML格式的站点地图,就国内来说,可以很好的帮助百度对站点的收录,不喜欢使用代码的同学可以使用这款插件。好吧,闲话不多说,还是来具体说一下如何纯使用代码实现网站地图吧。

XML格式网站地图
PHP代码
<?php
require('./wp-blog-header.php'); /* 此处引用WordPress程序文件,注意文件位置*/
header("Content-type: text/xml");
header('HTTP/1.1 200 OK');
$posts_to_show = 1000;
echo '<?xml version="1.0" encoding="UTF-8"?>';
echo '<urlset xmlns="http://www.sitemaps.org/schemas/sitemap/0.9" xmlns:mobile="http://www.baidu.com/schemas/sitemap-mobile/1/">'
?>
<!-- generated-on=<?php echo get_lastpostdate('blog'); ?> -->
 <url>
 <loc><?php echo get_home_url(); ?></loc>
 <lastmod><?php $ltime = get_lastpostmodified(GMT);$ltime = gmdate('Y-m-d\TH:i:s+00:00', strtotime($ltime)); echo $ltime; ?></lastmod>
 <changefreq>daily</changefreq>
 <priority>1.0</priority>
 </url>
<?php
/* 文章页面 */
$myposts = get_posts( "numberposts=" . $posts_to_show );
foreach( $myposts as $post ) { ?>
 <url>
 <loc><?php the_permalink(); ?></loc>
 <lastmod><?php the_time('c') ?></lastmod>
 <changefreq>monthly</changefreq>
 <priority>0.6</priority>
 </url>
<?php } /* 文章循环结束 */ ?>
<?php
/* 单页面 */
$mypages = get_pages();
if(count($mypages) > 0) {
 foreach($mypages as $page) { ?>
 <url>
 <loc><?php echo get_page_link($page->ID); ?></loc>
 <lastmod><?php echo str_replace(" ","T",get_page($page->ID)->post_modified); ?>+00:00</lastmod>
 <changefreq>weekly</changefreq>
 <priority>0.6</priority>
 </url>
<?php }} /* 单页面循环结束 */ ?>
<?php
/* 博客分类 */
$terms = get_terms('category', 'orderby=name&hide_empty=0' );
$count = count($terms);
if($count > 0){
foreach ($terms as $term) { ?>
 <url>
 <loc><?php echo get_term_link($term, $term->slug); ?></loc>
 <changefreq>weekly</changefreq>
 <priority>0.8</priority>
 </url>
<?php }} /* 分类循环结束 */?>
<?php
 /* 标签(可选) */
$tags = get_terms("post_tag");
foreach ( $tags as $key => $tag ) {
 $link = get_term_link( intval($tag->term_id), "post_tag" );
 if ( is_wp_error( $link ) )
 return false;
 $tags[ $key ]->link = $link;
?>
 <url>
 <loc><?php echo $link ?></loc>
 <changefreq>monthly</changefreq>
 <priority>0.4</priority>
 </url>
<?php } /* 标签循环结束 */ ?>
</urlset>
将以上代码保存为sitemap.php,上传到你的网站根目录。如果通过“域名/sitemap.php”可以访问则说明配置正确。如果你担心有人通过此文件恶意攻击你的网站,则可以将文件名改成其他字符并放在其他文件夹下调用。
注意:如果WordPress安装在子目录wordpress下,则更改路径为.wordpress/wp-blog-header.php 并丢在网站根目录下,当然你也可以不做改动直接将文件放在wordpress下,只不过此时访问路径变为了“域名/wordpress/sitemap.php”。
伪静态化
Nginx用户编辑如下伪静态规则,并重启服务器:
rewrite ^/sitemap.xml$ /sitemap.php last;
Apache用户在.htaccess中添加如下规则即可:
RewriteRule ^(sitemap)\.xml$ $1.php
需要注意的是如果你的WordPress程序安装在子目录wordpress下并且前面sitemap.php的路径没做改动,直接将sitemap.php放在了wordpress文件夹下则需要指明文件位置如下:
RewriteRule ^(sitemap)\.xml$ wordpress/$1.php
上面内容全部设置好后,你就可以直接通过访问http://blog.quietguoguo.com/sitemap.xml来访问本站XML格式的网站地图了。
HTML格式网站地图
与上面不同的是,HTML格式的网站地图我们是通过页面模板的方式实现的。这就意味着你进行完下面操作后需要新建一个页面使用页面模板来调出HTML格式的网站地图。具体步骤如下:
PHP代码
<?php
/**
@package WordPress
Template Name: SiteMap
*/
?>
<!DOCTYPE html PUBLIC "-//W3C//DTD XHTML 1.0 Transitional//EN" "http://www.w3.org/TR/xhtml1/DTD/xhtml1-transitional.dtd">
<html xmlns="http://www.w3.org/1999/xhtml">
<head profile="http://gmpg.org/xfn/11">
<meta http-equiv="Content-Type" content="text/html; charset=<?php bloginfo( 'charset' ); ?>" />
<title>SiteMap - <?php bloginfo('name'); ?></title>
<meta name="keywords" content="SiteMap,<?php bloginfo('name'); ?>" />
<meta name="copyright" content="<?php bloginfo('name'); ?>" />
<link rel="canonical" href="<?php echo get_permalink(); ?>" />
<style type="text/css">
body {font-family: Verdana;FONT-SIZE: 12px;MARGIN: 0;color: #000000;background: #ffffff;}
img {border:0;}
li {margin-top: 8px;}
.page {padding: 4px; border-top: 1px #EEEEEE solid}
.author {background-color:#EEEEFF; padding: 6px; border-top: 1px #ddddee solid}
#nav, #content, #footer {padding: 8px; border: 1px solid #EEEEEE; clear: both; width: 95%; margin: auto; margin-top: 10px;}
</style>
</head>
<body vlink="#333333" link="#333333">
<h2 style="text-align: center; margin-top: 20px"><?php bloginfo('name'); ?>'s SiteMap </h2>
<center></center>
<div id="nav"><a href="<?php bloginfo('url'); ?>/"><strong><?php bloginfo('name'); ?></strong></a> » <a href="<?php echo get_permalink(); ?>">SiteMap</a></div>
<div id="content">
<h3>最新文章</h3>
<ul>
<?php
$previous_year = $year = 0;
$previous_month = $month = 0;
$ul_open = false;
$myposts = get_posts('numberposts=-1&orderby=post_date&order=DESC');
foreach($myposts as $post) :
?>
<li><a href="<?php the_permalink(); ?>" title="<?php the_title(); ?>" target="_blank"><?php the_title(); ?></a></li>
<?php endforeach; ?>
</ul>
</div>
<div id="content">
<li class="categories">分类目录<ul>
<?php wp_list_categories('title_li='); ?>
</ul></li>
</div>
<div id="content">
<li class="categories">单页面</li>
<?php wp_page_menu( $args ); ?>
</div>
<div id="footer">查看博客首页: <strong><a href="<?php bloginfo('url'); ?>/"><?php bloginfo('name'); ?></a></strong></div><br />
<center>
<div style="text-algin: center; font-size: 11px">Latest Update: <?php $last = $wpdb->get_results("SELECT MAX(post_modified) AS MAX_m FROM $wpdb->posts WHERE (post_type = 'post' OR post_type = 'page') AND (post_status = 'publish' OR post_status = 'private')");$last = date('Y-m-d G:i:s', strtotime($last[0]->MAX_m));echo $last; ?><br /><br /></div>
</center>
<center>
<div style="text-algin: center; font-size: 11px">Powered by <strong><a href="http://blog.quietguoguo.com/" target="_blank">GuoGuo</a></strong>
© <?php echo date('Y'); ?> <a href="<?php bloginfo('url');?>/" style="cursor:help"><?php bloginfo('name');?></a> 版权所有.<br /><br /></div>
</center>
</body>
</html>
将以上代码保存成sitemap.php文件并放在主题文件夹下,注意文件编码格式一定要是以UTF-8无BOM格式编码,否则中文字符可能会出现乱码现象。
使用HTML网站地图
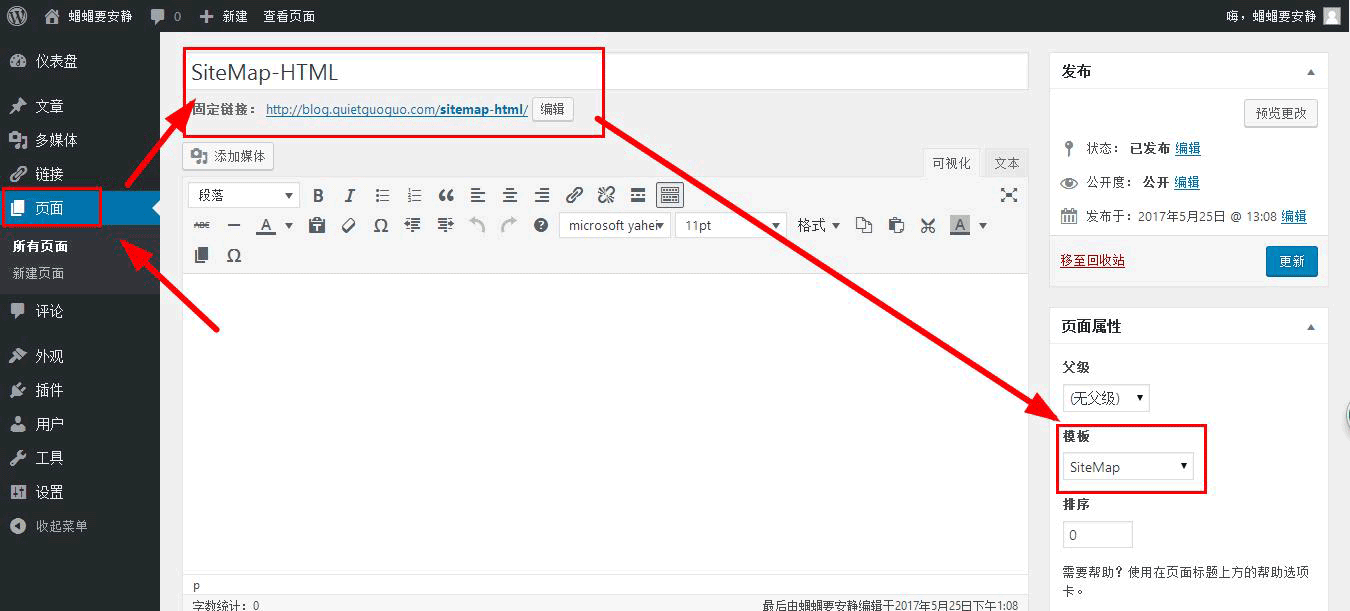
进入WordPress后台界面,新建一个页面,并使用SiteMap模板发布页面即可。
好了,设置完成后你就可以通过访问页面来查看效果了。
至此,HTML以及XML格式的网站地图的纯代码实现就完成了,如果你还有什么问题可以通过下方留言。